Configuring Layer Three EtherChannel
When you want more speed all you need is EtherChannel, EtherChannel can be configured as a layer three logical interface instead of just sitting at layer two. This is very helpful if we are running layer three down to the access layer switches, instead of at the distribution layer. You also could see this in a collapsed core design, we also don’t have to worry too much about STP when we configure EtherChannel’s. The only requirements to use layer three EtherChannels is your switch need is support layer three “routed” interfaces, so with that let's get started!
This is pretty much the same as configuring a layer two EtherChannel with one exception, in this example I’ve got three switches one access layer switch and two distribution/core switches. We are running layer three all the way down to the access layer, so we don’t have worry about STP between the two distribution/core switches and remember VLANs/Networks are locally significant to each access layer switch in this design.
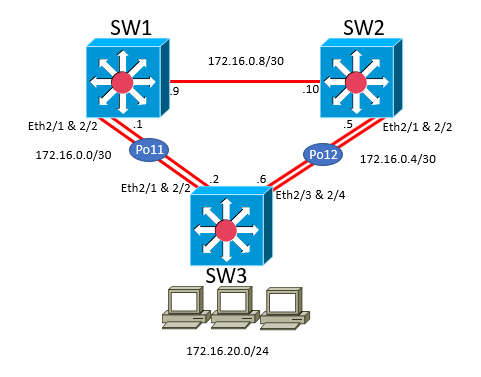
I have already configured SW1 and SW2 links between them as well as the network that SW3 has for the access layer, on SW1 and SW2 we need to create port-channels going to SW3.
1SW1(config)# interface ethernet2/1-2
2SW1(config-if-range)# channel-group 11 mode active
3SW1(config-if-range)# no shutdown
1SW2(config)# interface ethernet2/1-2
2SW2(config-if-range)# channel-group 12 mode active
3SW2(config-if-range)# no shutdown
Next after the port-channels are created we assign an IP address to the port-channel, this just like any other interface instead of using a dedicated port you use the port-channel..simple ;)
1SW1(config)# interface port-channel 11
2SW1(config-if)# ip address 172.16.0.1/30
1SW2(config)# interface port-channel 12
2SW2(config-if)# ip address 172.16.0.5/30
We now reference the same steps that we did with SW1 and SW2 on SW3. Let’s create two different port-channels because these are going to two different switches on SW3.
1SW3(config)# interface ethernet2/1-2
2SW3(config-if-range)# channel-group 11 mode active
3SW3(config-if-range)# no shutdown
4SW3(config)# interface ethernet2/3-4
5SW3(config-if-range)# channel-group 12 mode active
6SW3(config-if-range)# no shutdown
Just like what we did on SW1 and SW2, we need to assign IP addresses on these port-channels on SW3.
1SW3(config)# interface port-channel 11
2SW3(config-if)# ip address 172.16.0.2/30
3SW3(config-if)# interface port-channel 12
4SW3(config-if)# ip address 172.16.0.6/30
And…That’s it, this is pretty simple design to set up, if you put a routing protocol on it this can scale out easily. Each access switch would belong to a different network being able to map devices by physical location, instead of extending VLANs across the campus. I hope this information is helpful, Summer 2018 is right around the corner at the US of A so be sure enjoy it!