Private VLANs
Let's start out 2018 with private VLANs, with PVLANs the network gets a little more privacy added to it. When we have privacy on the network we can seclude certain parts of it. Essentially, "you can go about your business - move along, move along". Private VLANs allow us to segment networks within a single VLAN. So in this post we'll go over the types of PVLANs as well as setup a network topology with private VLANs, Let's get started!
So in order to have a private VLAN we have to create a normal VLAN. Which is also called a primary VLAN. Within that private VLAN we can configure it two different ways:
- Isolated private VLAN - Which is just what it sounds like, this type of VLAN is cut off from everything including hosts within that same isolated private VLAN. The only thing this VLAN can reach is the primary VLAN.
- Community private VLAN - Again just like the name sounds this type of VLAN can be grouped together with other members in the same private VLAN community. This enables members of the same community to be able to talk to each other in the same PVLAN. as well as being able to reach the primary VLAN. However these communities are isolated from each other so they can't talk to other private VLAN communities or isolated PVLANs.
Once we have set up the type of private VLAN we want we have to configure the individual ports on the switch, remember we have to always associate these private VLANs with a primary VLAN. We configure this on the individual switch port. There are two different types of modes for these switch ports:
- Promiscuous - This type of switch port mode is usually used for a common gateway device because when in this mode this port can talk to anything in primary or secondary VLAN.
- Host - Like the name says it, This port only talks to other ports in the same community or to any promiscuous port that is associated with on the same private VLAN. This is usually used is used for connecting hosts to the network with a PVLAN.
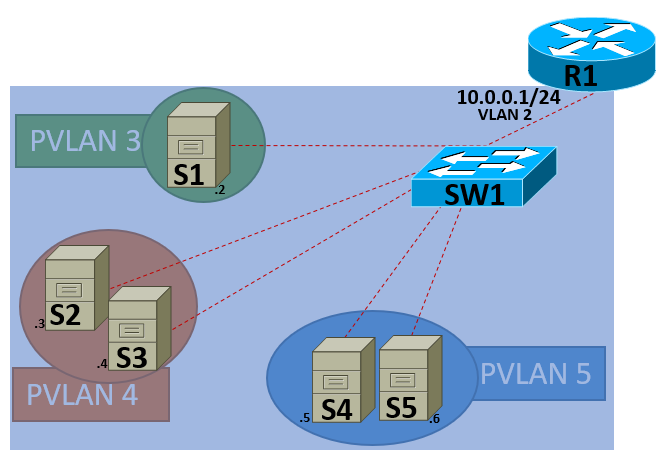
Let's look at an example of what the use case could be for using private VLANs. Acme Corp is getting into the hosting business and they have three customers/tenants so far, these three tenants are not related and these servers don't need to know about what else is on the network, they just need to connect to the internet through R1.

Each PVLAN is a different "customer" and we have separated these servers with different private VLANs. These servers although they are on the same 10.0.0.0/24 network, they can't talk to each other. All servers can reach R1, servers that are in the same community PVLAN can reach each other as well. The configuration is pretty simple we have to create four (4) VLANs, in this example I have created VLANs 2, 3, 4, and 5. VLAN 2 is are primary VLAN and we are associating VLANs 3, 4 and 5 within VLAN 2.
1SW1(config)# vlan 2
2SW1(config-vlan)# private-vlan primary
3SW1(config-vlan)# private-vlan association 3-5
Next we have to tell the switch which PVLANs are community PVLANs and which ones are isolated. In this example VLAN three (3) is an isoloated PVLAN. Where PVLANs four (4) and five (5) are community private VLANs
1SW1(config)# vlan 3
2SW1(config-vlan)# private-vlan isolated
3SW1(config-vlan)# exit
4SW1(config)# vlan 4
5SW1(config-vlan)# private-vlan community
6SW1(config-vlan)# exit
7SW1(config)# vlan 5
8SW1(config-vlan)# private-vlan community
After that we have to go into the individual switch ports for each server and router. Starting with R1 we are mapping VLANs 3, 4, and 5 to this port and turning on promiscuous. This allows R1 to be able to reach all hosts in these different PVLANs.
1SW1(config)# interface gigabitethernet 1/1
2SW1(config-if)# description to R1
3SW1(config-if)# switchport private-vlan mapping 2 3-5
4SW1(config-if)# switchport mode private-vlan promiscuous
5SW1(config-if)# exit
Let's jump to server-1's switch port. This PVLAN is isolated however it will still be able to reach R1 but not server-2/3/4/ or 5.
1SW1(config)# interface gigabitethernet 0/1
2SW1(config-if)# description to server-1
3SW1(config-if)# switchport private-vlan host-association 2 3
4SW1(config-if)# switchport mode private-vlan host
5SW1(config-if)# exit
Going over to server-2 and server-3's switch ports. This PVLAN is a community private VLAN, these servers will be able to reach each other and R1 but not server-1 or server-4/5.
 1SW1(config)# interface gigabitethernet 0/2
 2SW1(config-if)# description to server-2
 3SW1(config-if)# switchport private-vlan host-association 2 4
 4SW1(config-if)# switchport mode private-vlan host
 5SW1(config-if)# exit
 6SW1(config)# interface gigabitethernet 0/3
 7SW1(config-if)# description to server-3
 8SW1(config-if)# switchport private-vlan host-association 2 4
 9SW1(config-if)# switchport mode private-vlan host
10SW1(config-if)# exit
Last group of servers to configure is server-4 and server-5. The setup is pretty close to server-2 and server-3 just changing the PVLANs. These servers will be able to reach R1 and each other but not server-2/3 or server-1.
 1SW1(config)# interface gigabitethernet 0/2
 2SW1(config-if)# description to server-4
 3SW1(config-if)# switchport private-vlan host-association 2 5
 4SW1(config-if)# switchport mode private-vlan host
 5SW1(config-if)# exit
 6SW1(config)# interface gigabitethernet 0/3
 7SW1(config-if)# description to server-5
 8SW1(config-if)# switchport private-vlan host-association 2 5
 9SW1(config-if)# switchport mode private-vlan host
10SW1(config-if)# exit
Creating PVLANs is not just for hosting providers you could configure this in a campus network like on a distribution switch to separate floors, departments or even different businesses. If you have Cisco VIRL I have also created a VIRL topology, If you don't have VIRL you can still browse the XML data and copy the configuration over for you own lab.
Like always I hope this information is helpful! :)