Configure IPS (Intrusion Prevention System) via SDM
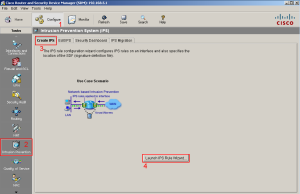
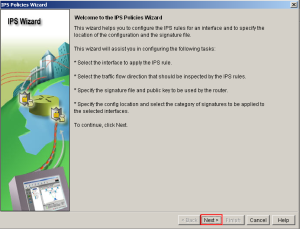
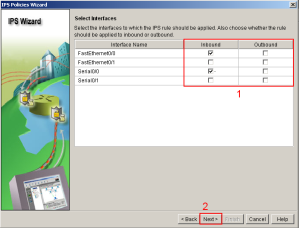
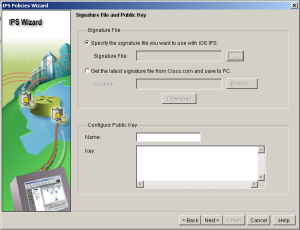
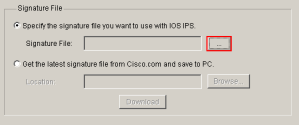
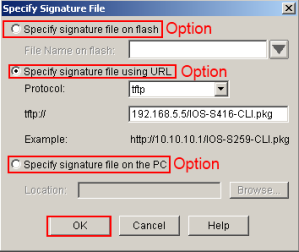
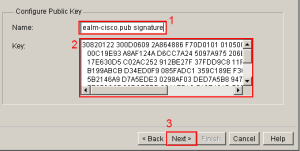
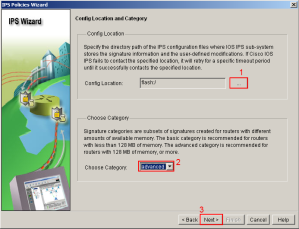
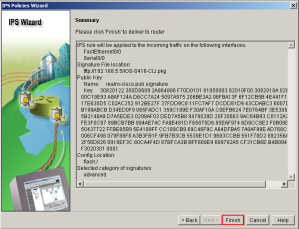
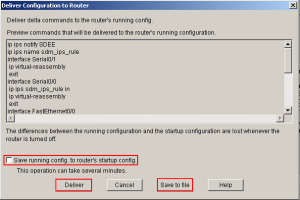
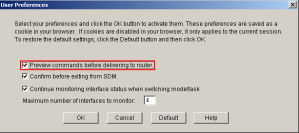
Awhile back I talked about the differences between IPS and IDS. (See the post Cisco IDS vs. IPS ) So for today's post let's learn how to configure an IPS (Intrusion Prevention System) on a router using the Cisco SDM (Security Device Manger). The Cisco SDM is a Web-based device management tool a GUI for Cisco routers this can simplify router deployments and cut ownership costs. ( See the post Configure Cisco SDM) Let's start configuring an IPS with SDM! This tutorial is assuming that the configurations to set up Cisco SDM have already been completed. For this tutorial all we want to focus on is configuring the IPS. Since this using Cisco SDM the IPS wizard is pretty easy to understand. Before we get started I like to have the Cisco SDM preview the commands before I deliver them to the router. To do that at the top of the menu bar click Edit and select Preferences a new window will appear (Like below) and verify that the Preview commands before delivering to the router is checked. Before we even jump into the IPS wizard we must verify that we have the IOS IPS signature package file and the public crypto key. If you don't have them you then must have a CCO account with Cisco to download them. Make sure that these files are available on the PC along with a TFTP server installed and running. Put or verify that the IOS IPS signature file is in the default TFTP folder (IOS-Sxxx-CLI.pkg) Remember that the X values will vary depending on the file that was download from Cisco. Also verify that the realm-cisco.pub.key.txt file is available on the computer and note its location. This file is the public key that it used by Cisco IOS IPS. Once Cisco SDM is opened click the configure button at the top of SDM screen and select Intrusion Prevention on the left hand side under Tasks. Click or verify that the Create IPS tab is selected and select the Launch IPS Rule Wizard button. If prompted for SDEE click ok. A window will show, the IPS Welcome Screen which gives the objectives the wizard will go over in helping us create an IPS system. Click Next. The next screen (IPS Interface) will want us to select which interface(s) will have the IPS rules, select either inbound or outbound. (For this tutorial both Fast-Ethernet 0/0 and Serial 0/0 will have the IPS rules inbound.) Click Next. The next screen (Signature File and Public Key) wants to know the following information, the location of the signature file and the public key. Focusing on the signature file first you want to specify the location where the signature file is. Click on the three dots button. Another window will open (Specify Signature File) if the signature file is already on the routers flash memory select the first radio button, if the signature file is by URL select the correct protocol and address, you can also specify the signature file on the PC. (For this tutorial we are using the TFTP server and are specifying the signature file by URL, once the location of the file has been selected click OK. Now let's focus on the Public Key, in the name of the public key type realm-cisco.pub or relam-cisco.pub signature. Find and open the realm-cisco.pub.key.txt file and copy (Ctrl-C) the text that is between the phrase key-string and the word quit. Paste the text (key) in the key field in the Configure Key section. Click Next. The next section (Config Location and Category) wants you to specify where you want the IPS configuration files click on the three dots and choose your location. (For this tutorial we are using flash to store the IPS configuration) Towards the bottom of the screen the wizard wants to choose a signature category for the router. (For this tutorial we are choosing the advanced option.) Click Next. The next section is the summary window for the IPS configuration, here you can look over the summary to verify the configuration. Click Finish. If you've selected the option to preview commands before delivering them to the router, a final window will appear. In this window you can see the actual commands the SDM program will attempt to deliver. You have the option to save the running-configuration to the startup-configuration after the commands complete. You also have the option to save the configuration as a file and finally you can deliver them to the router. That's it! believe it or not that's the SDM configuration of IOS IPS you can get more information at Cisco's website about SDM and the configuration settings. Like always I hope this tutorial was informative and if you have a suggestion on the next topic that relates to ICND1 or ICND2 and even some CCNA Security comment below.
Related Articles
- Help Keep Company Data Safe on Employees' Personal Devices (blogs.cisco.com)
- Digital Threats Jumped in 2010 (pcworld.com)
- Defending against SQL Injection attacks using Cisco ASA, IPS, and IOS Firewall - Cisco TAC Security Podcast (blogs.cisco.com)
- Study Finds Firewalls From Cisco, Fortinet, Others Vulnerable To Old Attack (blogs.forbes.com)