Configuring NAT (One to One Mapping)
In this simple tutorial we are going to be configuring a static NAT which is a one-to-one mapping between an inside IP address and an outside IP address. (One private to one permanent address) Using this type of NAT would be helpful for outside devices accessing your inside devices. (Like a web server) Let's get started!!
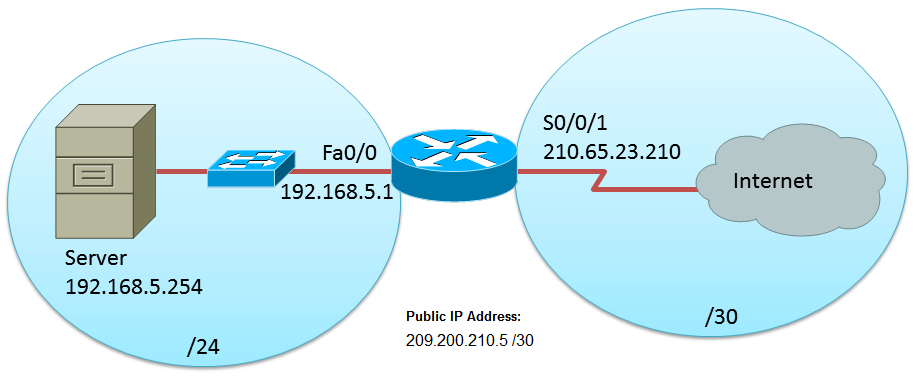
Looking at the topology above you can see that we have a server inside of are network and want people to access this server outside of are network. Using NAT will help us accomplish this task! (This tutorial is assuming that all configurations, like basic router configurations and IP addresses are in place and working before NAT is enabled for the above topology) In order for one to one mapping to work we first need to make an IP route that forwards the public IP address or addresses out towards the ISP. So on the router we would make an IP route to forward that IP address to the ISP router or the internet cloud.
1Router(config)#ip route 209.200.210.5 255.255.255.252 s0/0/1
The above command tells us that if the router sees this IP address (209.200.210.5 which is the public IP address assigned to us by the ISP) it will forward the packet out the serial interface of s0/0/1. The ISP will then forward the information to the destination. The next thing to do is create a static mapping on the router. This static mapping will be permanently assigned to an inside IP address and mapped to an outside IP address. You can make more than one, one to one mapping but remember you will also need additional public IP addresses from the ISP for each private address you want to translate. So the command to translate the server IP address into a public IP address would look like:
1Router(config)#ip nat inside source static 192.168.5.254 209.200.210.5
This command tells us that the IP address of 192.168.5.254 will be translated to 209.200.210.5. So any device outside of our network will be able to reach the server by using the 209.200.210.5 IP address.
Then you want to define the "inside" of your network and the "outside" of your network. So for this example the router's fastethernet 0/0 interface would be the inside of are network. (We have control over it) Move to the interface and use the ip nat inside command.
1Router(config)#interface fastEthernet 0/0
2Router(config-if)#ip nat inside
This command tells us that the fast ethernet interface 0/0 is in the inside of are network. You can also assign or have more than one ip nat inside interface. You also want to define the "outside" of your network. So for example the router's serial interface s0/0/1 would be the outside network. Move to the interface and use the ip nat outside command.
1Router(config)#interface s0/0/1
2Router(config-if)#ip nat outside
This command tells us that the serial interface of s0/0/1 and anything connected to it is the outside network (We don't have control over it.) You can also assign or have more than one ip nat outside interface. That's it!! You now have a one to one mapping to a public IP address. Remember that this tutorial is assuming that the ISP router (internet cloud for this topology) has a way back to the NAT router. If not than your device will be able to send information however any information trying to travel back to your device will fail. (So if you have control of the ISP router like in lab environments than just apply a static route back to the NAT router.) Hope this tutorial was Helpful!